
I've been experimenting. My kitchen is currently filled with plastic bags, a large array of saucepans, colanders, jugs, sieves and funnels. There's also a pervading odour of boiling vegetables.
A combination of Mother Nature, lots of worm poo, care & and attention and sheer luck, has produced a vast quantity of vegetables and fruit from my vegetable patch. Perhaps I need to get better at timing my planting so as to stagger my harvest, but this year everything has arrived at once. I'm doing pretty well munching my way through a wide variety of salad leaves but there's only a certain amount of peas one girl can eat. Some of the extra produce, I'm donating to friends and family but it seems a shame not to try to keep back some of the produce to use later on in the year.
So, I'm attempting to freeze my homegrown vegetables and fruit.
My Mum is expert at freezing vegetables (not her only talent, I should point out), having had plenty of practice freezing the excess produce from my Dad's vegetable patch. She tells me that there are many vegetables and fruit that will still taste delicious several months after freezing- reassuring me that they won't lose their taste or flavour.
Peas and beans are ideal for freezing. I blanched the beans by boiling them in water for a few minutes, and then popped them into plastic bags and into the freezer. With the peas, I shelled them first, which is a really satisfying job. I highly recommend doing it in the sunshine with a glass of something chilled and white. I then blanched them slightly, bagged them up and popped them in the freezer. My Mum's top tip for freezing peas is to make sure you use young, juicy ones, rather than older, starchier ones.
Tomatoes are very versatile and can be frozen raw or cooked. I began by cooking the tomatoes, then peeling them but, after a while, I decided it was just as easy to leave them raw and decide what to do with them when I want to use them. Freezing tomatoes means you will need to cook them after defrosting them because they will go a bit mushy but this is perfectly harmless.
Herbs are also great for freezing and, unlike dried herbs, can be used in the same quantities as when fresh. Although herbs will look limp and when defrosted, this will not affect their flavour as this will stay for several months after being frozen. You don't need to blanch them and they can just be bagged and frozen straight away. I've read that you can can put a few herbs into ice cube trays, mixed with water, and this makes a convenient way to use them straight from frozen as you simply plonk the ice cube straight into whatever you're cooking. Personally, I haven't tried this as my ice cube trays are fully stocked and ready for the evening G&Ts but it does, nevertheless, seem like a good idea.
Berry fruits just cry out to be frozen! You can make mixed bags of whatever takes your fancy, such as raspberries, blackcurrants and gooseberries, put them in the freezer after washing and de-stalking them, and you'll have readymade mixtures for crumbles, jams, pies and any number of delicious treats.
And finally, a useful but easily forgotten (if you're me) tip: label all your bags! It's really annoying if you come to find a bag of beans and can't distinguish it from the gooseberries. Sounds silly? Believe me, things look different covered in ice.
Wednesday, 4 August 2010
Thursday, 15 July 2010
We've got bees!
Wednesday was a very exciting day! I learnt that bees march. They really do!
I came across this fascinating piece of information when Richard, our Farm Manager and, so it seems resident bee keeper, came across a swarm of bees flying about outside our office.
Rob immediately got excited at the prospect of an excuse to leave his desk and was off and out of the office as fast as if the bees had been wriggling about in his pants.
 Five minutes later, he'd donned a bee-keeper's outfit and was in and amongst the swarm with Expert Richard. The bees we've now got on the farm are pretty chilled out as bees go and the risk of being stung is pretty minimal. Richard says that his at home are much more aggressive and that we are very fortunate to have "such beauties." Nonetheless, full hat, wellies and gloves were worn, just in case.
To keep and care for a swarm of bees, you've got to house them somewhere. Not only that, you've got to convince them that they want to live in the house that you're providing them with. So, Richardset up a box, near to where the bees were hanging out, with some ivy honey that his bees had made last year, to entice them.
After a couple of days, the box was full of bees happily munching on honey. Next job was to get them into a hive, which will become their permanent home. And this is where the marching comes in. Richard placed the box near to the opening of the hive, put some honey into the hive and waited. Before long, hundreds of bees were marching up the ramp into their new home. Magic! A few were dawdling, so these were helped along with the aid of a dustpan to scoop them up, although Richard assures us no bees were injured during this process.
Once installed in their hive, Richard has to settle them in and eventually get them making honey. The process of making honey will take at least 2 years.
To me, the buzzing of bees is synonymous with Summer. A lazy, sunny day just wouldn't be the same without that familiar hum. Unfortunately though, bees are on the decline, thanks to a multitude of reasons, mostly connected with modern living.
I try to keep this blog pretty light-hearted but I hope you'll excuse a rather chilling quote from Albert Einstein who makes things pretty clear: "If the bee disappeared off the surface of the globe, then man would only have four years of life left. No more bees, no more pollination, no more plants, no more animals, no more man."
Safe to say, we're pretty excited about having our own bees to nurture. Bees are great to have around the place. Not only will we hopefully get honey from them but they're brilliant at helping with pollination throughout the farm. They're especially useful for pollinating our strawberries, tomatoes, blueberries, peas and beans.
Watch a video of Richard encouraging the bees into their new home- look closely and you'll see the bees marching. (Apologies for the wonky angle!)
Tuesday, 22 June 2010
An Edible Garden at Glastonbury & other festival tales
We're very excited to be doing the round of festivals this year. Having just done a very successful stint at Sunrise festival, we'll also be taking Rocket Gardens out on the road over the summer, heading to, amongst others, Port Elliot, Gilfest, Camp Bestival & Harvest at Jimmy's.
Right now though, we're busy polishing our wellies, packing our shewee's and practising our sunshine dances- we're off to Glastonbury this weekend!
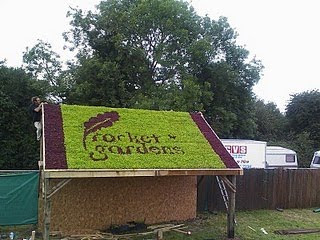
The Rocket Gardens crew is heading up the A303 to build a shed with an edible roof! In keeping with our mission to get everyone to joing the grow your own revolution, we're working with Greenpeace to design and build the tasty structure. The roof will be made up of 24,000 plants, crafted lovingly into a Greenpeace logo.
John, our resident computer whizz has been released from the confiines of his laptop and into the wilds of Somerset to get to work on the building of the shed, before the rest of us join him in time for the start of the festival. He sent us this photo:

It seemed a shame not to use all those plants for something a bit more useful afterwards though. So, we figured if would be the perfect opportunity to support Garden Organic's One Pot Pledge. Like us, they're working hard trying to encourage more people to have a go at growing their own veg', so we thought we'd try to help them out a bit. From midday on Sunday, festival-goers can stop by the Greenpeace stand and pick up a bit of Glastonbury to take home with them. When they sign up to the One Pot Pledge, they will be able to choose a plant from the Rocket Gardens roof display. We're hoping that people will recycle plastic cups by using them to carry their plant in, so that we can help with the big Glasto' clear-up, too!
Friday, 18 June 2010
Slugs and snails!
Slugs are part of a garden's natural habitat, so I prefer to think about keeping the little blighters away from my plants, rather than necessarily destroying them.
With this in mind, I have learnt that regular weeding is imperative as this ensures there are less hiding places for slugs and snails. Similarly, regular picking of crops, particularly leaves, can be effective. Picking strawberries, beans etc. regularly means there is less to tempt the creepy crawlies anyway.
One of the stranger pieces of advice I have received was to think like a slug and act accordingly. A bit weird but also oddly handy. Slugs like to hang out on and in walls, so it makes sense that if you plant things near a wall, the slugs have less far to travel and are more likely to munch your crops there. Canny planting can thus make a real difference to the survival of your crops.
Also, slugs are partial to a midnight snack or two, so a night-time patrol and launching a surprise attack can catch quite a few in the act. I've taken to doing this and (maybe I lead quite a dull life) but it can get quite exciting. Peering behind a leaf, only to discover a slug mid-munch, then removing it carefully to the safety of a distant patch of undergrowth, can be really rather satisfying.
 I can anticipate, however, a time when my nightly sojourns become slightly irksome. When this happens, I'm reserving my special weapon- beer. It turns out that slugs and snails are both partial to a drop or two of ale. Place a glass of beer next to the plants and the sugary, hoppy liquid will attract them. They'll then climb up the glass, plop into the beer, get drunk and drown. No all that ceremonious but it's a way to get rid of slugs and snails more permanently, when you're really fed up, without resorting to chemicals or sprays.
 Tuesday, 1 June 2010
Strawberries
Rob's been on his travels again. This time to the Big Smoke- London! It doesn't happen very often and it's quite an occasion when he does- he even shaved his beard this time.
He was up there to help out with a rather quirky and exciting project with Cafe Direct. They wanted to film him doing what the Rocket Team happen to think he does rather well: plant stuff.
The Cafe Direct crew have rather cunningly managed to acquire bits and pieces belonging to celebrities, which they've then used as plant containers. And Rob was the man to help them out! Hence, he found himself attacking Stella McCartney's handbag with an electric drill to make drainage holes. Absolute sacrilege, if you ask me!
Designer handbag massacre aside, Rob's adventures have definitely inspired me to want to have a go at growing my own strawberries. And I'm in good company it would seem, as the story goes that Henry VIII loved them and even ate them as a cure for gout.
Strawberries do need a bit of tender loving care- pretty and delicious as they are, they're also ever-so-slightly temperamental.
I'm using traditional strawberry plants, which are far more straightforward to grow than runners. Runners arrive in a dormant state and need to be soaked in water for half an hour and then planted, before they'll spark back into life. They then grow horizontal shoots, which then grow individual roots themselves. Whilst runners can produce more fruit than just plants, if you've only got a small amount of space, they can be a bit of a hassle because they'll root themselves in amongst gaps between other plants and take over. As a novice grower, I've decided to steer clear from this method of growing strawberries, for now.
I'm going to plant a couple of rows of strawberry plants in one of raised beds in the garden- this will hopefully keep me in strawberries for most of the Summer. I'm using an early variety (Honeoye), a mid-season variety (Cambridge Favourite) and a late variety (Judibell) in order to spread out the harvest.
I may well also plant a few pots on a window sill - partly as an experiment to see which grow best and partly because they'll look so pretty. That's the beauty of strawberries, it seems to me though: they'll grow in a variety of locations....pots, raised beds, gro-bags; inside or outside.
Strawberries love lots of compost and also a layer of straw laid amongst the plants keeps them protected and happy. I'm fast becoming a fan of worm cast fertiliser, so I'll put a good handful of it in each hole, before popping in each plant.
Strawberries really dislike the cold and frost can kill them so it's really important to cover them in fleece until all danger of frost has passed.
Because of their beautiful, brightly-coloured fruit, strawberries have quite a few admirers in the animal kingdom: slugs, snails, birds and badgers are all partial to the fruit. Regular checking of the plants and removing any pesky slugs and snails will hopefully solve that problem. Covering the plants in netting should stop birds from attacking. Badgers could prove a little more tricky, however....I'll keep you posted.
Although a little nervous that my plants survive, I'm really excited about picking my first crop of fruit and eating whole piles of them, slathered in Cornish Clotted Cream!
Wednesday, 12 May 2010
Borlotti Beans

I stumbled upon this contraption in one of the store rooms at Rocket HQ the other day and was immediately intrigued. Was it a miniature maypole? I realised probably not.
It's actually a climbing frame for Borlotti beans. Brilliant!
Borlotti beans grow on climbing plants and the plants need something to climb up, otherwise they droop over. The particular contraption that I found has 8 strings stemming from a central pole. Each string can be pulled out straight and secured with what looks like a tent peg. It's quite compact, so can be used in a container, as well as in beds.
One Borlotti seedling can be planted next to each string and as it grows it will wind itself round the string, keeping it nice and vertical. As they get taller, I'll probably have to secure them with ties, just to make sure they stay put.
It's also possible to use canes for growing beans on (runners being another climbing bean.) You can either place them individually in rows or make a tepee by placing them several canes in a circle, then tying them together at the top or placing a topper on it. If you've got a bit of space, you can also use netting.
I'm keen to use my new-found contraption though and so I'm going to stick with the climbing frame.
Borlotti plants are best sown outside from May onwards, when they are at least 5cm in height. Considering it's been so cold this year (there was snow up in Scotland yesterday, apparently!) I'm running the risk of killing them by planting them out right now but with a blog to write, I've got to plant something! It might be best to hold fire for a couple of weeks before planting them. Either that, or cover the baby plants up with fleece to protect them from the frost.
When choosing a spot to plant Borlottis, consider that they like plenty of sunshine. Dig a small hole, sprinkle in a small handful of organic fertiliser and then pop in the plant. They like plenty of space so try not to plant them too close together. An ideal space would be 30cm between each plant. Once they start flowering, they will need regular watering.
Marigolds are a good companion for Borlottis as they will help keep the bugs away. Slugs and snails are also partial to these particular plants so I'll have to do regular checks. If they do become a problem, I'm going to try sprinkling used filter coffee granules round the base of the plants, as this apparently is a deterrent. If that fails to work then I'll have to resort to the glass of beer trick, which draws the slugs in and then drowns them- a bit gruesome though!
Borlotti beans should be ready to harvest from August onwards. You can tell they're ready when the pods turn cream. Before that, they'll be speckled with red.
Monday, 3 May 2010
Earthing Up Potatoes

My potatoes are looking 'andsome!
In just a few weeks, the plants have shot up and are now a good foot or so high, with a thick covering of leaves. This means that the potatoes, hidden underneath the ground, should be growing well, too.

Unfortunately, just as the wanted plants are growing, so too are the weeds and so today it was time for a little bit of weeding. Luckily, the unwanted weeds were small enough to be pulled up by hand, which I did in between each row of potato plants.
The space now looking much clearer, I was told by my resident expert, to 'earth up' round the potatoes. As they get bigger, there is a danger that the potatoes themselves will start to emerge from the soil. This is bad news because, once in contact with the sunlight, they will turn green and become inedible. So, I scooped soil from in between the rows and mounded it on to each row of potatoes. This makes the depth between air and potato deeper, making it less likely for the potatoes to pop up as they continue to grow.
With any luck, I reckon I'll be eating home-grown potatoes by the end of May.
Sunday, 25 April 2010
Salad leaves

It appears there is no limit to my brother's talents! I arrived at his flat, which happens to be above the office at Rocket HQ (so that we can keep him working 24/7) and he proudly showed me to the direction of his balcony where there were 3 containers full of a variety of salad leaves. Considering we haven't yet reached May, this is quite a feat and so I made suitably impressed noises.
I imagined that there must be some clever gardener's trick that he had employed to get such successful results so early on in the season.
At this point, he went rather quiet.
At last, he confessed that, no, there was no trickery or voodoo magic involved, he had simply stumbled across some plugs leftover from last year and had casually sown them into the pots to see what would happen.
It would seem that our particularly mild climate, deep down in the southerly tip of the UK, means that plants, such as delicate-looking lettuce, are able to survive where in other parts they wouldn't be quite so lucky. The farm is also pretty well sheltered from any extremes of cold or wind.
I should probably now highlight that my aim of writing this is not to encourage you to ring up our office, demanding our Salad Garden immediately! Although Rob was lucky, it is definitely preferable to wait a month to be sure of success.
Having said that, the taste of those leaves, picked fresh from the ground and chopped straight into a salad is absolutely divine! If you've not tried growing salad yet, I cannot recommend highly enough that this is the year that you give it a go. As proven by Rob, you don't need much space, or skill, or even a very high attention span. The books say that lettuce likes shady, cool areas and damp soil. In a roundabout way, they imply that salad leaves are easy to grow.
From Rob's experience, I'd recommend the following:
Stick them in whatever container you have available. Water them occasionally (Rob admits he was sometimes a little sporadic with this). If they are outside, watering them is often done for you, straight from the sky.
Rob is now noticing though that a lot of the salad plants are going to seed, he reckons through lack of care and attention, so regular picking is good.
One book I read gave "Keep eating," as aftercare advice. Now that's something even the most novice of gardeners can surely do!
Monday, 12 April 2010
Onions
Inspired by a delicious recipe for onion and cheese pie in How to be a Domestic Goddess (I'm aiming high on the domesticity front!), onion sets are next on my list of "Things to plant."
 I'm growing Sturon onions, which are a variety that can be planted during the Spring. I'm planting mine in the raised beds that have already been prepared and, like the rhubarb, they like growing in a sunny spot. Onions are a good companion for carrots, so I'm told, as they help to keep the carrot fly at bay. Which is helpful.


I'm going to be growing some onions from plant and others from sets, to see how I get on with both. Onion sets are basically mini onions, which are meant to be much easier to grow than from plant. Despite this, I'm quite looking forward to attempting to grow from plant though- I like the surprise of not knowing how many onions you're going to harvest. With sets, the number of mini onions you plant is the same number you'll harvest- only, they'll hopefully have grown quite a lot bigger!
 I'm growing Sturon onions, which are a variety that can be planted during the Spring. I'm planting mine in the raised beds that have already been prepared and, like the rhubarb, they like growing in a sunny spot. Onions are a good companion for carrots, so I'm told, as they help to keep the carrot fly at bay. Which is helpful.
I've planted the onion sets straight into the ground, without digging a trench or anything as they need to be planted only shallowly. I pushed each bulb into the ground, leaving the tips only barely showing. If you leave too much tip showing, there's a danger that birds will uproot them. I left a space of about a hand-width between each onion. The books tell me you have to be particularly fastidious about weeding around onion plants because their thin leaves can't deal with competing weeds (bless, the delicate little things!)
And that's it! A big tick for the ease of planting onions! Completely faff-free! I just hope that they grow just as easily!
PS. I had a look at my forced rhubarb just now and it is looking FANTASTIC! Bright red and delicious- I can't wait for it to be ready. As a comparison, I also planted some in pots and left them to grow normally- although they're growing, they are nowhere near as big or as brightly-coloured as the forced stuff.


Forced rhubarb (not a very convincingly Unforced rhubarb- much
red photo, I'm afraid.) smaller!
Wednesday, 31 March 2010
Raised beds (part 2)
It took a little longer than I intended to write this post as there are so many exciting things happening on the farm at the moment. The polytunnels are filling up with plants fast, the bluebells are popping up their green bits in the woods and the fruit bushes in the field are all turning from lifeless looking twigs to bushy green things.
I’ve been thinking a lot about the garden over the last month, this is a lot to do with the pile of wood staring at me through the office window. My normal way of tackling a project is to get stuck in and work my way through problems as they arise. I’ve had mixed success with this way of working, but since I’m having to explain what I’m doing and there’s the potential for loads of people to see me muck this up, planning seems to have taken a front seat.
To kick this planning process off I decided to measure out the space I had available. After a frustrating half hour of searching for a tape measure, I gave up and moved onto plan b. I’m not entirely sure on the accuracy of this method but it suited my needs just fine – logging onto Google Earth I found that my patch measures 19m/13m.
Armed with my dubious measurements, an excellent selection of stationary I’d liberated from the office, I set to making a scale plan of the garden. To make life easy I choose a 1cm to 1m scale, with this I drew out the tiny 19cm by 13cm garden onto A3 paper.
 At this point I had to decide how I was going to rotate my vegetable patch. There are a few schools of thought here. Because I have plenty of space and wood I thought I’d try two of them- the 3 and 4 bed rotations. As the title suggests, I need 4 beds for one of them and 3 for the other. I also want a bed for rhubarb, one for asparagus, one for flowers to attract bees, one for strawberries and a spare one just in case I run out of room. That's a total of 12 beds.
During the build I wanted to waste as little material as possible. With this in mind, I decided on making a good proportion of the beds 5m long as this was the length the wood arrived in. I found some old card and cut out a few 5/1.2m beds to my crafty new scale and laid them out onto the garden plan to see how they would fit in. Once these were on the paper I soon realised that I couldn’t make all 12 beds 5m long. After a bit of sliding beds around I decided that 6 would fit in quite nicely. This meant the four beds for one of the rotations were sorted, plus my strawberry bed and spare one. Based on the space I had left, I cut out some 3/1.2cm beds and slid these around until I found that five fitted in. This covered the 3 bed rotation, rhubarb bed and asparagus. With a good space free in the centre of the garden and an excellent supply of willow in the woods at the bottom of the farm, I decided on a 3m round bed for all the pretty flowers.
Once I was happy with how everything was laid out I found a tape measure and ventured outside to double check the garden measurements. Reasonably happy with how everything worked out, I checked that the Rocket crew were happy with it and then firmed up the design with a biro. Planning completeish, I’d better head into the workshop and start building.
Cheers and gone,
Rob
I’ve been thinking a lot about the garden over the last month, this is a lot to do with the pile of wood staring at me through the office window. My normal way of tackling a project is to get stuck in and work my way through problems as they arise. I’ve had mixed success with this way of working, but since I’m having to explain what I’m doing and there’s the potential for loads of people to see me muck this up, planning seems to have taken a front seat.
To kick this planning process off I decided to measure out the space I had available. After a frustrating half hour of searching for a tape measure, I gave up and moved onto plan b. I’m not entirely sure on the accuracy of this method but it suited my needs just fine – logging onto Google Earth I found that my patch measures 19m/13m.
Armed with my dubious measurements, an excellent selection of stationary I’d liberated from the office, I set to making a scale plan of the garden. To make life easy I choose a 1cm to 1m scale, with this I drew out the tiny 19cm by 13cm garden onto A3 paper.

During the build I wanted to waste as little material as possible. With this in mind, I decided on making a good proportion of the beds 5m long as this was the length the wood arrived in. I found some old card and cut out a few 5/1.2m beds to my crafty new scale and laid them out onto the garden plan to see how they would fit in. Once these were on the paper I soon realised that I couldn’t make all 12 beds 5m long. After a bit of sliding beds around I decided that 6 would fit in quite nicely. This meant the four beds for one of the rotations were sorted, plus my strawberry bed and spare one. Based on the space I had left, I cut out some 3/1.2cm beds and slid these around until I found that five fitted in. This covered the 3 bed rotation, rhubarb bed and asparagus. With a good space free in the centre of the garden and an excellent supply of willow in the woods at the bottom of the farm, I decided on a 3m round bed for all the pretty flowers.
Once I was happy with how everything was laid out I found a tape measure and ventured outside to double check the garden measurements. Reasonably happy with how everything worked out, I checked that the Rocket crew were happy with it and then firmed up the design with a biro. Planning completeish, I’d better head into the workshop and start building.
Cheers and gone,
Rob
Thursday, 18 March 2010
Jamie's Plot (Seed Potatoes, part 2)

I was lucky enough to visit my friend, Jamie's beautiful allotment at the weekend, down at Prussia Cove, in Cornwall. I think he's possibly the luckiest gardener, ever! Take a look at the view from his plot- it's gorgeous! (finally, I've added the photo!)
Jamie's a little bit more experienced than I am at gardening and has quite a large space to fill. I haven't measured it and neither has he but it must be somewhere in the region of 50 square metres that he's got to play with.
The plot hasn't been used for several years and so needed a lot of tlc before Jamie could begin to start planting. Brambles had pretty much taken over the whole site, so firstly he had to get his strimmer out and clear it all. Next up, he had to roughly mark out where he was going to have each plot and dig over the ground. He did this all by hand, using a shovel and then a hoe. It took him a whole afternoon to do this but, having watched him work, I think it would probably have taken me about two weeks. He then covered the freshly-dug soil with compost.
So far, he's planted his potatoes as finally the ground has warmed up enough to do so without delaying their growth. He's planted 40 of Rocket Gardens' seed potatoes; a few of each of our varieties.
Like me, Jamie has planted early varieties of potatoes, which should harvest by May. Not only does this mean we should get to eat our delicious crops sooner, rather than later, it also means we should avoid the perils of potato blight, which I hear is one of the greatest risks to potato crops. Although early varieties are particularly susceptible to the disease, it doesn't usually hit until July so we should miss it.
For those of you planning later potato crops, here is some info' about potato blight, as I understand it:
- Potato blight is a fungus-like organism, which affects the green parts of the potato plant, causing them to fall apart.
- Wet, soggy leaves are one of the causes of potato blight so watering the plants can help spread the disease. It's best to water the soil around the plant, rather than all over the leaves.
- Growing several varieties, especially when laid out in alternative rows, can help reduce the spread of the disease.
- Warm, dry, sunny conditions are the best way to fend off blight- those of you who have experienced our British 'Summers' can see why we need to worry about the disease!
- If you do get blight, pull off the infected areas and discard them by throwing them away or burning them- don't use them for compost.
I got my information from http://www.potato.org.uk/, which also has a blight watch service, so you can keep an eye on prevalence of the disease in your area.
Thursday, 11 March 2010
Forcing Rhubarb
When those in the know at Rocket HQ suggested I grow forced rhubarb, I wasn't that keen. It sounded rather violent and not very natural. However, after a bit of a talking to, followed by a bit of reading up, I discovered that actually it's more 'encouraging' than 'forcing.' By preventing natural light from reaching the emerging rhubarb plants, they shoot upwards more quickly than normal, trying to search for light. The result, so I'm told, will be delicious tasting, bright red fruit.
Everything I've read and every conversation I've had about rhubarb tells me that it's the easiest thing to grow. Perfect for a beginner like me, then. Although you can grow rhubarb from seed, apparently year-old plants, called crowns, are the best way to do it. I'm more than happy to let someone else do the hard work for me, so I collected some ready-made crowns from the greenhouses at Rocket Gardens. These pinky-greeny fleshy blobs (I'm getting really technical here) come in 3-litre pots and just the tip of the crown pokes out the top of the soil.
Everything I've read and every conversation I've had about rhubarb tells me that it's the easiest thing to grow. Perfect for a beginner like me, then. Although you can grow rhubarb from seed, apparently year-old plants, called crowns, are the best way to do it. I'm more than happy to let someone else do the hard work for me, so I collected some ready-made crowns from the greenhouses at Rocket Gardens. These pinky-greeny fleshy blobs (I'm getting really technical here) come in 3-litre pots and just the tip of the crown pokes out the top of the soil.
Having prepared the beds last weekend, I was able to transfer the rhubarb crowns straight into the ground. I was told to choose a spot that receives plenty of sun, at which point, I got really confused- surely if they're going to be covered up to prevent them from seeing the sun, choosing a sunny spot to plant them in is, at best, slightly silly and, at worst, just teasing the poor plants? Again, I was wrong.
Rhubarb plants will harvest annually for around 10 years and it's only the first month or so of each growing season when you might want to cover them up and 'force' them. The rest of the time, the sunnier the spot, the sweeter and more fruitful the plants will be.
 So, I chose the perfect sun trap spot and simply dug a hole about 30cm in depth into the bed and put in a handful of wormcast. I then emptied the contents of one of the 3-litre pots, and popped it into the hole. I then covered it all over and gave it a pat with my hand (I'm not quite sure why I pat the soil but I vaguely remember doing it whilst gardening with my Dad when I was little and old habits die hard.) Finally, I placed a bucket over the top of the newly-planted rhubarb and weighted it down with a large stone. I'd been warned that rhubarb likes to spread and so needs rather a lot of space, so I placed each plant about half a metre apart.
They'll take a month until they're ready to harvest initially and at this point I'll leave the bucket off and let the plants get some sunshine. Generally, the harvest season lasts between March and July, although this will be pushed back somewhat with the harsh Winter that we've had. Who knows, in Scotland, you may well be picking rhubarb well into August!
If you do fancy having a go at growing some forced rhubarb, Rob says there's still time to order some from us. In fact, his exact words were, "they're beauties!"
There's a scrumptious-looking Jamie Oliver recipe for rhubarb bellinis that I just can't wait to try!
 I'm hoping my rhubarb turns out like this!
Monday, 8 March 2010
Raised beds from recycled materials
I was supposed to be writing a post this week about designing my raised beds, but I decided to go on holiday instead. However, because I’m so dedicated to the Rocket Gardens cause, I’m now writing this is, whilst sat in a bar, nursing a cold beer, at the bottom of the slopes. It’s a hard life!.
I realised late last week that not everyone has a saw mill with a friendly owner nearby. Not only that, it’s not always that easy to transport materials from a saw mill unless you have a trailer or van. This started me thinking about other cheap or free materials that are available for creating beds or containers. I’m sure you’ll be able to come up with more interesting ideas than I have but here a few to get you going.
Firstly, used car tyres are brilliant. They can be fitted in the back of a car and can be picked up for nothing from a local tyre fitter. They're great for growing carrots, courgettes or even spuds, if you stack them on top of one another. Raised beds made out of tyres look a bit like the tyre walls in the Grand Prix. They also hold compost rather well, too.
Old soft drink cans are pretty handy if you can collect enough of them. We’ve built raised beds from them in the past by sticking them together using silicone (which can be bought from a DIY store) and then making them into a circular raised bed.
If you have any builders nearby, see if you can get hold of the big nylon bags that sand comes in. They hold compost really quite well and if you don’t grab them they’ll probably get put in the bin.
Reclamation yards are also a brilliant source of building goodies. They will have a whole host of fantastic things to grow in- old floor boards, bricks and a million other things, if you keep your mind open.
If you have any ideas that you’d like to share, please comment and tell everyone about it.
I'm back off to the slopes!
Cheers and gone,
Rob
Thursday, 4 March 2010
Growing Potatoes (part 1)

What with winter lingering rather chillingly in the air and the inches of snow that some of the country have seen, the growing season has been put back by a couple of weeks. That's actually quite lucky for a late-starter like me though because it means I haven't missed the boat to get some early potatoes in the ground.
Not so very long ago, I imagined that you just dug a hole in the ground, stuck in some potatoes you had lying around that you hadn't yet baked, fried or mashed, and waited for them to magically sprout more little tatties. Surprise, surprise; there's actually a little more to it than that.
In order to get any harvest at all, you have to use chitted seed potatoes. (Chitted means potatoes that have little green shoots poking out them.) Each shoot is new growth and, once in the ground, will be where the new harvest of potatoes will grow from. A good number of shoots on each seed potato is 2 to 3- any more than that and there won't necessarily be enough food from the original potato to supply all the new growth.
So, I've had a delivery of ready-chitted potatoes and I'm ready to get going! Although I could have planted them straight into the garden, the ground is still a little bit cold (the ideal temperature to get them moving quickly is 9 degrees c. Anything lower than 4 degrees c and they stay dormant.) So, instead I've put the seed potatoes into egg boxes (one potato in each egg holder.) I've placed them with their green shoots facing upwards and set them all on a sunny windowsill in my kitchen. I also kept each potato variety seperated and labeled them, too- the theory being that I can do the same when I plant them out and be able to keep track of what I'm digging up.
I'm using Maris Peer, Ambo, Orla, Charlotte and Colleen varieties. As it's my first go, I thought I'd try several different sorts to see if any grow better than others and also which I like the taste of. It's also no coincidence that these varieties are available on the Rocket Gardens website- but then I figure, there's got to be some benefit to working for the family firm!
Setting the potatoes in egg boxes is great because it keeps them upright and (hopefully) the shoots will grow nice and straight. Alternative holders would be egg cups or even cup cake holders. I ran out of egg boxes though and so I used a cereal box, clumping several potatoes together, and they don't seem to be any the worse for it. (I can tell I'm not going to be a particularly fastidious gardener!)
It's been beautifully sunny and spring-like over the weekend and the shoots have responded to the warmth already- I'm sure it's not my imagination and over-enthusiasm and the shoots really have got longer. I'll have to wait a couple of weeks, until the shoots have reached 2-3 cm in length and then I can plant the potatoes into the ground.
Partly because it's necessary and partly because I'm too excited to be able to leave my potato-related activity at that, I also started preparing the ground outside this weekend. I've dug over the raised bed, which is going to house them and also covered the ground in compost. I then dug in some organic worm cast fertiliser for good measure, in order to make sure the ground is full of nutrients when it comes to planting time.
Considering this has been my first full weekend dedicated to being a 'real' gardener, I think it went pretty well. It's been brilliant having an excuse to be outside, and digging up compost feels like a much more wholesome calorie-burning activity than going for a run. So far, so good!
Tuesday, 2 March 2010
Raised Beds (part 1)
My sister wrote some lovely things about me last week but I thought it was best to introduce myself briefly in my own words. I like taking things apart and trying to put them back together again without too many bits left over. I like bumbling through the woods with my dog and mucking about in my boat on the Helford River. I think that it should only rain at night and snow is brilliant for short periods. I love what I do at Rocket Gardens and now that I’m settled at the farm, it’s time to start a veg patch.
I have an area just outside the office that’s 14 metres by 18 metres that I’d like to fill with 6 raised beds. I’m going to try and do everything quickly and on the cheap to prove that gardening doesn’t have to be expensive or all-consuming. I want to create a garden for all the rocket staff to use and enjoy that looks nice and is easy to maintain.

Over the weekend I went down to see a friendly chap at a local sawmill and picked up a load of waste timber to build my beds from. This is a much cheaper option than using railway sleepers or wood bought from the builders merchants, not only that it gives me a warm fuzzy feeling inside to be using something that no-one else wants.
During the coming week I’ll draw up a garden plan, mark out the beds and I’ll post about it next week so you can see how I got on.
Cheers and gone,
Rob
Wednesday, 24 February 2010
Welcome to Rocket Gardens' blog!
From feedback we've received over the last few months, it seems that lots of you would like to know a bit more about who the people behind Rocket Gardens are and also the opportunity to have a bit more of a two-way conversation with us.
 Rob lives by the maxim that there's no point doing something small when you can do something HUGE! He's second-in-command at Rocket Gardens and oversees the operations of the farm, making sure all the baby plants are taken care of until they're passed over to you. Rob tends to get quite excited about all things Rocket Gardens; particularly those that don't involve sitting at a desk and this can sometimes get out of hand. Last year, for example, he decided that simply taking plants to Glastonbury just wasn't enough to show how great Rocket Gardens really is - next thing we know, he constructed a rather large barn, complete with a roof made entirely of seedlings and is transporting it up the A30 on the back of a trailer.
We're new to this blogging lark, so do bear with us to begin with but feel free to give us feedback about whether you find what we're writing interesting. We're hoping that the Rocket blog will be:
- a way to learn more about what goes on behind the scenes at Rocket HQ
- somewhere to answer your questions about planting, harvesting and cooking somewhere you can share you successes, advice and ask us any burning gardening questions about planting, harvesting and cooking somewhere you can share you successes, advice and tips with us and other Rocketeers... and ask us any burning gardening questions you might have.
- Altough there's quite a few of us that make up the Rocket Gardens team, to start with, it'll be Rob and me (Kimberley) who'll be the main Rocket bloggers. However, there may well be other members of the team who add bits and pieces as we go along.
Rob lives by the maxim that there's no point doing something small when you can do something HUGE! He's second-in-command at Rocket Gardens and oversees the operations of the farm, making sure all the baby plants are taken care of until they're passed over to you. Rob tends to get quite excited about all things Rocket Gardens; particularly those that don't involve sitting at a desk and this can sometimes get out of hand. Last year, for example, he decided that simply taking plants to Glastonbury just wasn't enough to show how great Rocket Gardens really is - next thing we know, he constructed a rather large barn, complete with a roof made entirely of seedlings and is transporting it up the A30 on the back of a trailer.It's all good fun though and certainly keeps life exciting down on the farm. Rob will be writing about what he's getting up to and what that means for your Rocket Gardens.
I'm Kimberley and honestly, I'm pretty new to this gardening game, having lived in the city for several years. Being Rob's sister though, I couldn't escape Rocket World forever and last Summer I gave into the pull of my Cornish roots and returned home. I now work at Rocket HQ, supposedly focusing on the PR side of things but I quite often find myself doing slightly odd things like transporting 5000 bags for packing cabbage to a windswept field on the edge of the farm. I still haven't worked out whether this is because of my diverse range of skills or simply because I'm Rob's sister and therefore easily manipulated.
This year will be my first attempt at growing fruit and vegetables but I'm fully intending to throw myself wholeheartedly into living the good life and I can't wait to get planting my little seedlings. I'm going to be writing about my attempts to get to grips with gardening, as well as sharing advice, tips and recipes that I manage to pick up along the way.
So that's it for now! See you back here in a few days time, when we'll (hopefully) have something interesting for you to read.
Alternatively, you can check out our website or Facebook
Subscribe to:
Posts (Atom)


