Wednesday, 31 March 2010
Raised beds (part 2)
I’ve been thinking a lot about the garden over the last month, this is a lot to do with the pile of wood staring at me through the office window. My normal way of tackling a project is to get stuck in and work my way through problems as they arise. I’ve had mixed success with this way of working, but since I’m having to explain what I’m doing and there’s the potential for loads of people to see me muck this up, planning seems to have taken a front seat.
To kick this planning process off I decided to measure out the space I had available. After a frustrating half hour of searching for a tape measure, I gave up and moved onto plan b. I’m not entirely sure on the accuracy of this method but it suited my needs just fine – logging onto Google Earth I found that my patch measures 19m/13m.
Armed with my dubious measurements, an excellent selection of stationary I’d liberated from the office, I set to making a scale plan of the garden. To make life easy I choose a 1cm to 1m scale, with this I drew out the tiny 19cm by 13cm garden onto A3 paper.
At this point I had to decide how I was going to rotate my vegetable patch. There are a few schools of thought here. Because I have plenty of space and wood I thought I’d try two of them- the 3 and 4 bed rotations. As the title suggests, I need 4 beds for one of them and 3 for the other. I also want a bed for rhubarb, one for asparagus, one for flowers to attract bees, one for strawberries and a spare one just in case I run out of room. That's a total of 12 beds.
During the build I wanted to waste as little material as possible. With this in mind, I decided on making a good proportion of the beds 5m long as this was the length the wood arrived in. I found some old card and cut out a few 5/1.2m beds to my crafty new scale and laid them out onto the garden plan to see how they would fit in. Once these were on the paper I soon realised that I couldn’t make all 12 beds 5m long. After a bit of sliding beds around I decided that 6 would fit in quite nicely. This meant the four beds for one of the rotations were sorted, plus my strawberry bed and spare one. Based on the space I had left, I cut out some 3/1.2cm beds and slid these around until I found that five fitted in. This covered the 3 bed rotation, rhubarb bed and asparagus. With a good space free in the centre of the garden and an excellent supply of willow in the woods at the bottom of the farm, I decided on a 3m round bed for all the pretty flowers.
Once I was happy with how everything was laid out I found a tape measure and ventured outside to double check the garden measurements. Reasonably happy with how everything worked out, I checked that the Rocket crew were happy with it and then firmed up the design with a biro. Planning completeish, I’d better head into the workshop and start building.
Cheers and gone,
Rob
Thursday, 18 March 2010
Jamie's Plot (Seed Potatoes, part 2)
Jamie's a little bit more experienced than I am at gardening and has quite a large space to fill. I haven't measured it and neither has he but it must be somewhere in the region of 50 square metres that he's got to play with.
The plot hasn't been used for several years and so needed a lot of tlc before Jamie could begin to start planting. Brambles had pretty much taken over the whole site, so firstly he had to get his strimmer out and clear it all. Next up, he had to roughly mark out where he was going to have each plot and dig over the ground. He did this all by hand, using a shovel and then a hoe. It took him a whole afternoon to do this but, having watched him work, I think it would probably have taken me about two weeks. He then covered the freshly-dug soil with compost.
So far, he's planted his potatoes as finally the ground has warmed up enough to do so without delaying their growth. He's planted 40 of Rocket Gardens' seed potatoes; a few of each of our varieties.
Like me, Jamie has planted early varieties of potatoes, which should harvest by May. Not only does this mean we should get to eat our delicious crops sooner, rather than later, it also means we should avoid the perils of potato blight, which I hear is one of the greatest risks to potato crops. Although early varieties are particularly susceptible to the disease, it doesn't usually hit until July so we should miss it.
For those of you planning later potato crops, here is some info' about potato blight, as I understand it:
- Potato blight is a fungus-like organism, which affects the green parts of the potato plant, causing them to fall apart.
- Wet, soggy leaves are one of the causes of potato blight so watering the plants can help spread the disease. It's best to water the soil around the plant, rather than all over the leaves.
- Growing several varieties, especially when laid out in alternative rows, can help reduce the spread of the disease.
- Warm, dry, sunny conditions are the best way to fend off blight- those of you who have experienced our British 'Summers' can see why we need to worry about the disease!
- If you do get blight, pull off the infected areas and discard them by throwing them away or burning them- don't use them for compost.
I got my information from http://www.potato.org.uk/, which also has a blight watch service, so you can keep an eye on prevalence of the disease in your area.
Thursday, 11 March 2010
Forcing Rhubarb
Everything I've read and every conversation I've had about rhubarb tells me that it's the easiest thing to grow. Perfect for a beginner like me, then. Although you can grow rhubarb from seed, apparently year-old plants, called crowns, are the best way to do it. I'm more than happy to let someone else do the hard work for me, so I collected some ready-made crowns from the greenhouses at Rocket Gardens. These pinky-greeny fleshy blobs (I'm getting really technical here) come in 3-litre pots and just the tip of the crown pokes out the top of the soil.
Monday, 8 March 2010
Raised beds from recycled materials
I realised late last week that not everyone has a saw mill with a friendly owner nearby. Not only that, it’s not always that easy to transport materials from a saw mill unless you have a trailer or van. This started me thinking about other cheap or free materials that are available for creating beds or containers. I’m sure you’ll be able to come up with more interesting ideas than I have but here a few to get you going.
Firstly, used car tyres are brilliant. They can be fitted in the back of a car and can be picked up for nothing from a local tyre fitter. They're great for growing carrots, courgettes or even spuds, if you stack them on top of one another. Raised beds made out of tyres look a bit like the tyre walls in the Grand Prix. They also hold compost rather well, too.
Old soft drink cans are pretty handy if you can collect enough of them. We’ve built raised beds from them in the past by sticking them together using silicone (which can be bought from a DIY store) and then making them into a circular raised bed.
If you have any builders nearby, see if you can get hold of the big nylon bags that sand comes in. They hold compost really quite well and if you don’t grab them they’ll probably get put in the bin.
Reclamation yards are also a brilliant source of building goodies. They will have a whole host of fantastic things to grow in- old floor boards, bricks and a million other things, if you keep your mind open.
If you have any ideas that you’d like to share, please comment and tell everyone about it.
I'm back off to the slopes!
Cheers and gone,
Rob
Thursday, 4 March 2010
Growing Potatoes (part 1)

Not so very long ago, I imagined that you just dug a hole in the ground, stuck in some potatoes you had lying around that you hadn't yet baked, fried or mashed, and waited for them to magically sprout more little tatties. Surprise, surprise; there's actually a little more to it than that.
In order to get any harvest at all, you have to use chitted seed potatoes. (Chitted means potatoes that have little green shoots poking out them.) Each shoot is new growth and, once in the ground, will be where the new harvest of potatoes will grow from. A good number of shoots on each seed potato is 2 to 3- any more than that and there won't necessarily be enough food from the original potato to supply all the new growth.
So, I've had a delivery of ready-chitted potatoes and I'm ready to get going! Although I could have planted them straight into the garden, the ground is still a little bit cold (the ideal temperature to get them moving quickly is 9 degrees c. Anything lower than 4 degrees c and they stay dormant.) So, instead I've put the seed potatoes into egg boxes (one potato in each egg holder.) I've placed them with their green shoots facing upwards and set them all on a sunny windowsill in my kitchen. I also kept each potato variety seperated and labeled them, too- the theory being that I can do the same when I plant them out and be able to keep track of what I'm digging up.
Tuesday, 2 March 2010
Raised Beds (part 1)
I have an area just outside the office that’s 14 metres by 18 metres that I’d like to fill with 6 raised beds. I’m going to try and do everything quickly and on the cheap to prove that gardening doesn’t have to be expensive or all-consuming. I want to create a garden for all the rocket staff to use and enjoy that looks nice and is easy to maintain.
Over the weekend I went down to see a friendly chap at a local sawmill and picked up a load of waste timber to build my beds from. This is a much cheaper option than using railway sleepers or wood bought from the builders merchants, not only that it gives me a warm fuzzy feeling inside to be using something that no-one else wants.
During the coming week I’ll draw up a garden plan, mark out the beds and I’ll post about it next week so you can see how I got on.
Cheers and gone,
Rob
Wednesday, 24 February 2010
Welcome to Rocket Gardens' blog!
- a way to learn more about what goes on behind the scenes at Rocket HQ
- somewhere to answer your questions about planting, harvesting and cooking somewhere you can share you successes, advice and ask us any burning gardening questions about planting, harvesting and cooking somewhere you can share you successes, advice and tips with us and other Rocketeers... and ask us any burning gardening questions you might have.
- Altough there's quite a few of us that make up the Rocket Gardens team, to start with, it'll be Rob and me (Kimberley) who'll be the main Rocket bloggers. However, there may well be other members of the team who add bits and pieces as we go along.
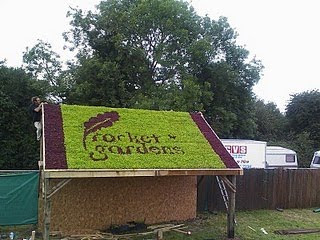
Rob lives by the maxim that there's no point doing something small when you can do something HUGE! He's second-in-command at Rocket Gardens and oversees the operations of the farm, making sure all the baby plants are taken care of until they're passed over to you. Rob tends to get quite excited about all things Rocket Gardens; particularly those that don't involve sitting at a desk and this can sometimes get out of hand. Last year, for example, he decided that simply taking plants to Glastonbury just wasn't enough to show how great Rocket Gardens really is - next thing we know, he constructed a rather large barn, complete with a roof made entirely of seedlings and is transporting it up the A30 on the back of a trailer.It's all good fun though and certainly keeps life exciting down on the farm. Rob will be writing about what he's getting up to and what that means for your Rocket Gardens.
I'm Kimberley and honestly, I'm pretty new to this gardening game, having lived in the city for several years. Being Rob's sister though, I couldn't escape Rocket World forever and last Summer I gave into the pull of my Cornish roots and returned home. I now work at Rocket HQ, supposedly focusing on the PR side of things but I quite often find myself doing slightly odd things like transporting 5000 bags for packing cabbage to a windswept field on the edge of the farm. I still haven't worked out whether this is because of my diverse range of skills or simply because I'm Rob's sister and therefore easily manipulated.
This year will be my first attempt at growing fruit and vegetables but I'm fully intending to throw myself wholeheartedly into living the good life and I can't wait to get planting my little seedlings. I'm going to be writing about my attempts to get to grips with gardening, as well as sharing advice, tips and recipes that I manage to pick up along the way.
So that's it for now! See you back here in a few days time, when we'll (hopefully) have something interesting for you to read.
Alternatively, you can check out our website or Facebook